Lift-and-Shift Guide
This guide describes how to move (“Lift-and-Shift”) an on-premises WebLogic Server domain to a cloud environment running Kubernetes using Verrazzano.
Overview
The Initial steps create a very simple on-premises domain that you will move to Kubernetes. The sample domain is the starting point for the lift and shift process; it contains one application (ToDo List) and one data source. First, you’ll configure the database and the WebLogic Server domain. Then, in Lift and Shift, you will move the domain to Kubernetes with Verrazzano. This guide does not include the setup of the networking that would be needed to access an on-premises database, nor does it document how to migrate a database to the cloud.
What you need
-
MySQL Database 8.x - a database server
-
WebLogic Server 12.2.1.4.0 - an application server; Note that all WebLogic Server installers are supported except the Quick Installer.
-
Maven - to build the application
-
WebLogic Deploy Tooling (WDT) - v1.9.15 or later, to convert the WebLogic Server domain to and from metadata
-
WebLogic Image Tool (WIT) - v1.9.13 or later, to build the Docker image
Initial steps
In the initial steps, you create a sample domain that represents your on-premises WebLogic Server domain.
Create a database using MySQL called tododb
-
Download the MySQL image from Docker Hub.
$ docker pull mysql:latest -
Start the container database (and optionally mount a volume for data).
$ export MYSQL_USER=<your-mysql-username> $ export MYSQL_PASSWORD=<your-mysql-password> $ export MYSQL_ROOT_PASSWORD=<your-mysql-rootpassword> $ docker run --name tododb \ -p 3306:3306 \ -e MYSQL_USER=$MYSQL_USER \ -e MYSQL_PASSWORD=$MYSQL_PASSWORD \ -e MYSQL_DATABASE=tododb \ -e MYSQL_ROOT_PASSWORD=$MYSQL_ROOT_PASSWORD \ -d mysql:latest -
Start a MySQL client to change the password algorithm to
mysql_native_password.- Assuming the database server is running, start a database CLI client.
$ docker exec \ -it tododb mysql \ -uroot \ -p - When prompted for the password, enter the password for the root user.
- After being connected, run the
ALTERcommand at the MySQL prompt.$ ALTER USER '<your-mysql-username>'@'%' identified with mysql_native_password by '<your-mysql-password>';
- Assuming the database server is running, start a database CLI client.
Create a WebLogic Server domain
-
If you do not have WebLogic Server 12.2.1.4.0 installed, install it now.
-
Choose the
GENERICinstaller from WebLogic Server Downloads and follow the documented installation instructions. -
Be aware of these domain limitations:
- There are two supported domain types, single server and single cluster.
- Domains must use:
- The default value
AdminServerforAdminServerName. - WebLogic Server listen port for the Administration Server:
7001. - WebLogic Server listen port for the Managed Server:
8001. - Note that these are all standard WebLogic Server default values.
- The default value
-
Save the installer after you have finished; you will need it to build the Docker image.
-
To make copying commands easier, define an environment variable for
ORACLE_HOMEthat points to the directory where you installed WebLogic Server 12.2.1.4.0. For example:$ export ORACLE_HOME=$HOME/Oracle/Middleware/Oracle_Home
-
-
Use the Oracle WebLogic Server Configuration Wizard to create a domain called
tododomain.NOTE: This example assumes that the on-premises WebLogic Server domain is on Linux.
- Launch
$ORACLE_HOME/oracle_common/common/bin/config.sh. - Select Create a new domain.
- Specify a
Domain Locationof<oracle home>/user_projects/domains/tododomainand click Next. - Select the Basic WebLogic Server Domain [wlserver] template and click Next.
- Enter the password for the administrative user and click Next.
- Accept the defaults for
Domain ModeandJDK, and click Next. - Select Administration Server and click Next.
- Ensure that the server name is
AdminServerand click Next. - Click Create.
- After it has completed, click Next, then Finish.
- Launch
-
To start the newly created domain, run the domain’s start script.
$ $ORACLE_HOME/user_projects/domains/tododomain/bin/startWebLogic.sh -
Access the WebLogic Server Administration Console of the newly started domain with your browser, for example, http://localhost:7001/console, and log in using the administrator credentials you specified.
Add a data source configuration to access the database
Using the WebLogic Server Administration Console, log in and add a data source configuration to access the MySQL database. During the data source configuration, you can accept the default values for most fields, but the following fields are required to match the application and database settings you used when you created the MySQL database.
-
In the left pane in the Console, expand Services and select Data Sources.
-
On the Summary of JDBC Data Sources page, click New and select Generic Data Source.
-
On the JDBC Data Sources page, enter or select the following information:
- Name:
tododb - JNDI Name:
jdbc/ToDoDB - Database Type:
MySQL
- Name:
-
Click Next and then click Next two more times.
-
On the Create a New JDBC Data Source page, enter the following information:
- Database Name:
tododb - Host name:
localhost - Database Port:
3306 - Database User Name:
<your-mysql-username> - Password:
<your-mysql-password> - Confirm Password:
<your-mysql-password>
- Database Name:
-
Click Next.
-
Select Test Configuration, and make sure you see “Connection Test Succeeded” in the
Messagesfield of the Console.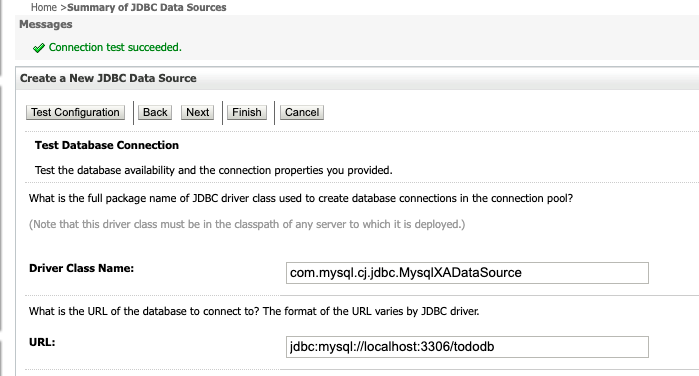
-
Click Next.
-
On the Select Targets page, select
AdminServer. -
Click Finish to complete the configuration.
Build and deploy the application
-
Using Maven, build this project to produce
todo.war.NOTE: You should clone this repo outside of
$ORACLE_HOMEor copy the WAR file to another location, as WDT may ignore it during the model creation phase.$ git clone https://github.com/verrazzano/examples.git $ cd examples/todo-list/ $ mvn clean package -
Using the WebLogic Server Administration Console, deploy the ToDo List application.
- In the left pane in the Console, select Deployments and click Install.
- Use the navigation links or provide the file path to
todo.war, typically<repo>/todo-list/target. For example, if you cloned the examples repository in your$HOMEdirectory, the location should be$HOME/examples/examples/todo-list/target/todo.war. - Click Next twice, then Finish.
NOTE: The remaining steps assume that the application context is
todo.
Initialize the database
After the application is deployed and running in WebLogic Server, access the http://localhost:7001/todo/rest/items/init
REST service to create the database table used by the application. In addition to creating the application table,
the init service also will load four sample items into the table.
If you get an error here, go back to the Select Targets page in the WebLogic Server Administration Console and make sure
that you selected AdminServer as the data source target.
Access the application
- Access the application at
http://localhost:7001/todo/index.html.
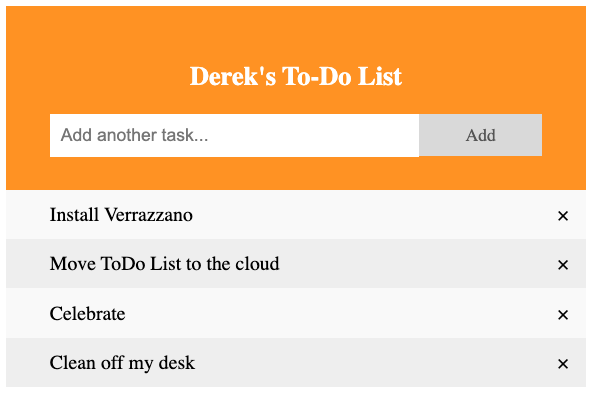
- Add a few entries or delete some.
- After verifying the application and database, you may shut down the local WebLogic Server domain.
Lift and Shift steps
The following steps will move the sample domain to Kubernetes with Verrazzano.
Create a WDT Model
- If you have not already done so, download v1.9.15 or later of WebLogic Deploy Tooling (WDT) from GitHub.
- Unzip the installer
weblogic-deploy.zipfile so that you can accessbin/discoverDomain.sh. - To make copying commands easier, define an environment variable for
WDT_HOMEthat points to the directory where you installed WebLogic Deploy Tooling.$ export WDT_HOME=/install/directory
For example, to get the latest version:
$ curl -OL https://github.com/oracle/weblogic-deploy-tooling/releases/latest/download/weblogic-deploy.zip
$ unzip  weblogic-deploy.zip
$ cd weblogic-deploy
$ export WDT_HOME=$(pwd)
To create a reusable model of the application and domain, use WDT to create a metadata model of the domain.
- First, create an output directory to hold the generated scripts and models.
- Then, run WDT
discoverDomain.$ mkdir v8o $ $WDT_HOME/bin/discoverDomain.sh \ -oracle_home $ORACLE_HOME \ -domain_home /path/to/domain/dir \ -model_file ./v8o/wdt-model.yaml \ -archive_file ./v8o/wdt-archive.zip \ -target vz \ -output_dir v8o
You will find the following files in ./v8o:
create_k8s_secrets.sh- A helper script withkubectlcommands to apply the Kubernetes secrets needed for this domainvz-application.yaml- Verrazzano application configuration and component filevz_variable.properties- A set of properties extracted from the WDT domain modelwdt-archive.zip- The WDT archive file containing the ToDo List application WAR filewdt-model.yaml- The WDT model of the WebLogic Server domain
If you chose to skip the Access the application step and did not verify that the ToDo List application was deployed, then you should verify that you see the todo.war file inside the wdt-archive.zip file. If you do not see the WAR file, there was something wrong in your deployment of the application on WebLogic Server that will require additional troubleshooting in your domain.
Create a Docker image
At this point, the Verrazzano model is just a template for the real model. The WebLogic Image Tool will fill in the placeholders for you, or you can edit the model manually to set the image name and domain home directory.
- If you have not already done so, download WebLogic Image Tool (WIT) from GitHub.
- Unzip the installer
imagetool.zipfile so that you can accessbin/imagetool.sh. - To make copying commands easier, define an environment variable for
WIT_HOMEthat points to the directory where you installed WebLogic Image Tool.$ export WIT_HOME=/install/directory
For example, to get the latest WIT tool:
$ curl -OL https://github.com/oracle/weblogic-image-tool/releases/latest/download/imagetool.zip
$ unzip imagetool.zip
$ cd imagetool
$ export WIT_HOME=$(pwd)
You will need a Docker image to run your WebLogic Server domain in Kubernetes. To use WIT to
create the Docker image, run imagetool create. Although WIT will download patches and PSUs for you, it does not yet
download installers. Until then, you must download the WebLogic Server
and Java Development Kit installer
manually and provide their location to the imagetool cache addInstaller command.
# The directory created previously to hold the generated scripts and models.
$ cd v8o

$ $WIT_HOME/bin/imagetool.sh cache addInstaller \
  --path /path/to/installer/jdk-8u231-linux-x64.tar.gz \
  --type jdk \
  --version 8u231

# The installer file name may be slightly different depending on
# which version of the 12.2.1.4.0 installer that you downloaded, slim or generic.
$ $WIT_HOME/bin/imagetool.sh cache addInstaller \
  --path /path/to/installer/fmw_12.2.1.4.0_wls_Disk1_1of1.zip \
  --type wls \
  --version 12.2.1.4.0

$ $WIT_HOME/bin/imagetool.sh cache addInstaller \
  --path /path/to/installer/weblogic-deploy.zip \
  --type wdt \
  --version latest

# Paths for the files in this command assume that you are running it from the
# v8o directory created during the `discoverDomain` step.
$ $WIT_HOME/bin/imagetool.sh create \
  --tag your/repo/todo:1 \
  --version 12.2.1.4.0 \
  --jdkVersion 8u231 \
  --wdtModel ./wdt-model.yaml \
  --wdtArchive ./wdt-archive.zip \
  --wdtVariables ./vz_variable.properties \
  --resourceTemplates=./vz-application.yaml \
  --wdtModelOnly
The imagetool create command will have created a local Docker image and updated the Verrazzano model with the domain home
and image name. Check your Docker images for the tag that you used in the create command using docker images from the Docker
CLI.
If everything worked correctly, it is time to push that image to the container registry that Verrazzano will use to access the image from Kubernetes. You can use the Oracle Cloud Infrastructure Registry (OCIR) as your repository for this example, but most Docker compliant registries should work.
The variables in the vz-application.yaml resource template should be resolved with information from the image tool build.
Verify this by looking in the v8o/vz-application.yaml file to make sure that the image: {{{imageName}}} value has been
set with the given --tag value.
Push the image to your repo.
NOTE: The image name must be the same as what is in the vz-application.yaml file under
spec > workload > spec > image for the tododomain-domain component.
$ docker push your/repo/todo:1
Deploy to Verrazzano
After the application image has been created, there are several steps required to deploy the application into a Verrazzano environment.
These include:
- Creating and labeling the
tododomainnamespace. - Creating the necessary secrets required by the ToDo List application.
- Creating the Verrazzano components such as Service, Deployment, and ConfigMap required by the MySQL instance in the
tododomainnamespace. - Updating the
vz-application.yamlfile to enable the Verrazzano MySQL components in the ToDo List ApplicationConfiguration to deploy as Kubernetes objects. - Updating the
vz-application.yamlfile to use the Verrazzano MySQL deployment and (optionally) expose the WebLogic Server Administration Console. - Applying the
vz-application.yamlfile.
The following steps assume that you have a Kubernetes cluster and that Verrazzano is already installed in that cluster.
Label the namespace
Create the tododomain namespace, and add labels to allow the WebLogic Server Kubernetes Operator to manage it and
enabled for Istio.
$ kubectl create namespace tododomain
$ kubectl label namespace tododomain verrazzano-managed=true istio-injection=enabled
Create the required secrets
If you haven’t already done so, edit and run the create_k8s_secrets.sh script to generate the Kubernetes secrets.
WDT does not discover passwords from your existing domain. Before running the create secrets script, you will need to
edit create_k8s_secrets.sh to set the passwords for the WebLogic Server domain and the data source. In this domain,
there are a few passwords that you need to enter:
- Administrator credentials
- ToDo database credentials
For example:
# Update <admin-user> and <admin-password> for weblogic-credentials
$ create_paired_k8s_secret weblogic-credentials <your-WLS-username> <your-WLS-password>

# Update <user> and <password> for tododomain-jdbc-tododb
$ create_paired_k8s_secret jdbc-tododb <your-mysql-username> <your-mysql-password>
Then run the script:
$ sh ./create_k8s_secrets.sh
Verrazzano will need a credential to pull the image that you just created, so you need to create one more secret.
The name for this credential can be changed in the vz-application.yaml file to anything you like, but it defaults to tododomain-registry-credentials.
Assuming that you leave the name tododomain-registry-credentials, you will need to run a kubectl create secret command similar to the following:
$ kubectl create secret docker-registry tododomain-registry-credentials \
  --docker-server=phx.ocir.io \
  --docker-email=your.name@example.com \
  --docker-username=tenancy/username \
  --docker-password='passwordForUsername' \
  --namespace=tododomain
Update the application configuration
Update the generated vz-application.yaml file for the todo application to:
-
Update the
tododomain-configmapcomponent to use the in-cluster MySQL service URLjdbc:mysql://mysql.tododomain.svc.cluster.local:3306/tododbto access the database.wdt_jdbc.yaml: | resources: JDBCSystemResource: 'todo-ds': JdbcResource: JDBCDriverParams: # This is the URL of the database used by the WebLogic Server application URL: "jdbc:mysql://mysql.tododomain.svc.cluster.local:3306/tododb" -
Update the
tododomain-appconfApplicationConfiguration to enable Verrazzano MySQL components to be deployed as Kubernetes objects.The file vz-application-modified.yaml is an example of a modified vz-application.yaml file. A diff of these two sample files is shown:apiVersion: core.oam.dev/v1alpha2 kind: ApplicationConfiguration metadata: name: tododomain-appconf namespace: tododomain annotations: version: v1.0.0 description: "tododomain application configuration" spec: components: - componentName: tododomain-domain traits: - trait: apiVersion: oam.verrazzano.io/v1alpha1 kind: IngressTrait spec: rules: - paths: # application todo - path: "/todo" pathType: Prefix - componentName: tododomain-configmap - componentName: todo-mysql-service - componentName: todo-mysql-deployment - componentName: todo-mysql-configmap$ diff vz-application.yaml vz-application-modified.yaml 30a31,33 > - componentName: todo-mysql-service > - componentName: todo-mysql-deployment > - componentName: todo-mysql-configmap 102c105 < URL: "jdbc:mysql://localhost:3306/tododb" --- > URL: "jdbc:mysql://mysql.tododomain.svc.cluster.local:3306/tododb"
Create Verrazzano components for MySQL
As noted previously, moving a production environment to Verrazzano would require migrating the data as well. While data migration is beyond the scope of this guide, we will still need to include a MySQL instance to be deployed with the application in the Verrazzano environment.
To do so, first, we need to create the Verrazzano components for MySQL by applying the mysql-oam.yaml file in the tododomain namespace. The components will be deployed as Kubernetes objects when the ToDo List application is deployed by applying the vz-application.yaml file in the next step.
-
Download the mysql-oam.yaml file.
-
Then, apply the YAML file:
$ kubectl apply -f mysql-oam.yaml

# Expected response
component.core.oam.dev/todo-mysql-service created
component.core.oam.dev/todo-mysql-deployment created
component.core.oam.dev/todo-mysql-configmap created
$ kubectl get components -ntododomain

# Expected response
todo-mysql-configmap    ConfigMap       26s
todo-mysql-deployment   Deployment      26s
todo-mysql-service      Service         26s
Deploy the ToDo List application and MySQL instance
Finally, run kubectl apply to apply the Verrazzano components and Verrazzano application configuration files to start your domain.
$ kubectl apply -f vz-application.yaml
This will:
- Create the application Component resources for the ToDo List application.
- Deploy the Verrazzano component resources as Kubernetes objects and create the MySQL instance.
- Create the application configuration resources that create the instance of the ToDo List application in the Verrazzano cluster.
Wait for the ToDo List example application to be ready.
$ kubectl wait pod \
    --for=condition=Ready tododomain-adminserver \
    -n tododomain

# Expected response
pod/tododomain-adminserver condition met
Verify that the pods are in the Running state.
$ kubectl get pod -n tododomain

# Sample output
NAME                     READY   STATUS    RESTARTS   AGE
mysql-55bb4c4565-c8zf5   1/1     Running   0          8m
tododomain-adminserver   4/4     Running   0          5m
Access the application from your browser
-
Get the generated host name for the application.
$ kubectl get gateways.networking.istio.io tododomain-tododomain-appconf-gw \ -n tododomain \ -o jsonpath={.spec.servers[0].hosts[0]} # Sample output tododomain-appconf.tododomain.11.22.33.44.nip.io -
Initialize the database by accessing the
initURL.https://tododomain-appconf.tododomain.11.22.33.44.nip.io/todo/rest/items/init -
Access the application.
https://tododomain-appconf.tododomain.11.22.33.44.nip.io/todo
Access the WebLogic Server Administration Console
-
Set up port forwarding.
$ kubectl port-forward pods/tododomain-adminserver 7001:7001 -n tododomainNOTE: If you are using the Oracle Cloud Infrastructure Cloud Shell to run
kubectl, in order to access the WebLogic Server Administration Console using port forwarding, you will need to runkubectlon another machine. -
Access the WebLogic Server Administration Console from your browser.
http://localhost:7001/console
NOTE
It is recommended that the WebLogic Server Administration Console not be exposed publicly.Feedback
Was this page helpful?
Glad to hear it! Please tell us how we can improve.
Sorry to hear that. Please tell us how we can improve.